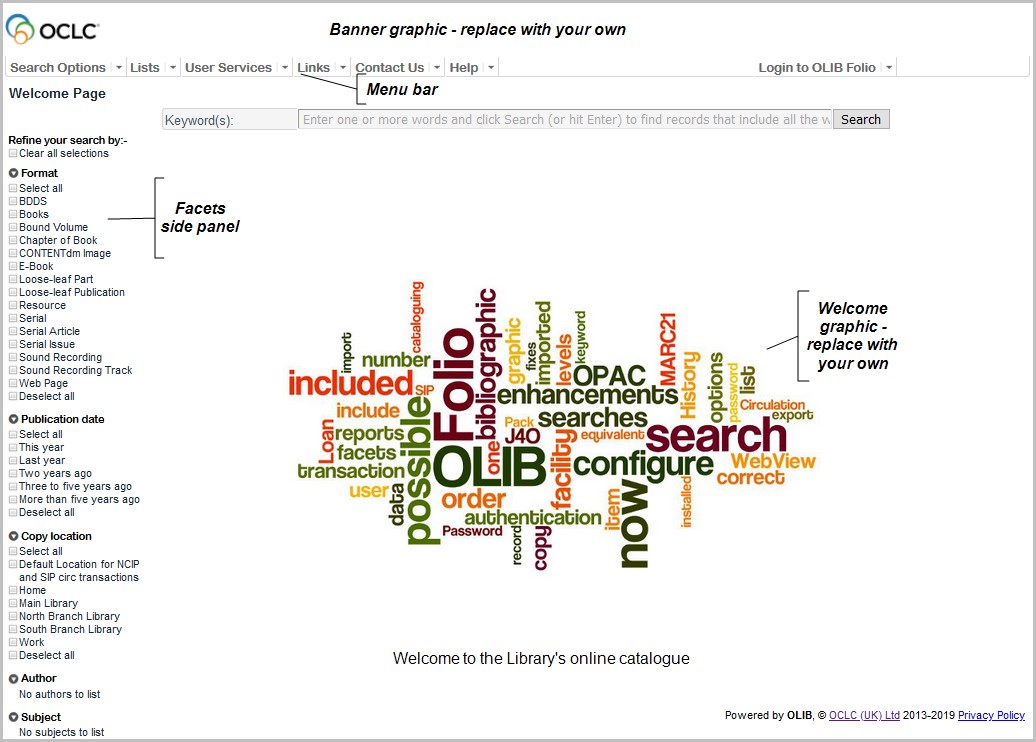
Welcome screen
At installation the Folio welcome screen will include a number of default graphics and settings which you will need to change to represent your own organisation and the options you want to offer to your users. There are 10 elements to this which you can configure to your own requirements.
A default welcome screen is provided as shown below. It displays the OLIB Word Cloud and a generic message Welcome to the Library’s online catalogue.

The following settings determine how each of the above sections in Folio appear or function.
- Go to OPAC> Configuration Settings.
- Search for the setting referenced below in the right hand column.
- Edit the setting record as required.
| 區段 | Function | 場景 |
|---|---|---|
| Menu bar | The menu options that are displayed and the order of display. | menu_options in g_menu |
| Cookie message | Cookie warning message which will appear the 1st time Folio is opened in a new browser. | Links to the Folio cookie statement (olib_cookies.html in the WebView/html directory). Text displayed on screen controlled by cookie_reminder_text in gno_startup. |
| Application title | The title of the application – defaults to Folio. | applicationTitle in gno_startup |
| Banner graphic | The top graphic – clicking on this re-loads Folio. | bannerGraphic in gno_startup. Replace with your own graphic. |
| Login option | The login option. | Login Option |
| User name | Displays the logged in user at the top of the screen. | l_loginmenu_username in gno_startup. The Value field contains <FNAME> <SNAME> (forename and surname). Edit if required to include only the forename for example. |
| Footer | The footer and copyright statement. | footerDisplayText in gno_startup. |
| Facets sidebar | The facets sidebar. | Facets sidebar configuration |
| Search form | The search form. | Search options |
| Welcome screen | A standalone html page. | welcome_screen in gno_startup. Replace with your own html page. |
| 語言 | Alternative language interface, only present if enabled. | AltInterfaceMenu in gno_startup. |
The welcome screen can either be
- html configured directly in the welcome_message setting in OLIB Web
- a standalone html page which is located in the WebView/pphtml directory on the web server together with configuration of the welcome_screen setting
If the welcome_message setting is not included (or if its Value field is blank) the welcome_screen setting will be used to determine what is displayed on Folio's Welcome screen.
The default Welcome screen is the OLIB word cloud shown above. By default this is enabled because the welcome_message setting is set with Include=Yes.
To revert back to an older / original welcome screen, go to the welcome_message configuration setting and set Include=No.
html in the welcome_message setting
This method is easiest for OLIB system managers to configure without reliance on further technical services. The graphics file(s) that you point to can be files that reside anywhere on the internet or on your host organisation's intranet.
- Go to OPAC> Configuration Settings.
- Search for welcome_message to configure an existing setting.
- Enter the preferred html in the Value field:
concat("<div style='width:90%'><br /><br /><p align='center'><span>",
"<IMG ALIGN='CENTER' SRC='", gnosys_html, "/icons/OLIBWordCloud.jpg'>",
"</span></p><p align='center'>",
 "<span style='font-size:12pt;'><br /><br />Welcome to the Library's online catalogue</span></p></div>")
- Set Include=Yes.
Examples
For example, to display an image using an http reference, replace ,gnosys_html, "/icons/OLIBWordCloud.jpg with e.g:
http://www.signaturecarhire.co.uk/blog/wp-content/gallery/maserati-granturismo/maserati-granturismo-front-white.jpg
As an example, the following html will display two png files, one below the other, centered underneath the search box:
“<div style=‘width:90%’><p align=‘center’><span><IMG ALIGN=‘CENTER’ SRC=‘http://binghamgsh1/rssfeeds/NCNFolioWelcomeScreen1.png’></span>
 </p><p align=‘center’><span><IMG ALIGN=‘CENTER’ SRC=‘http://binghamgsh1/rssfeeds/NCNFolioWelcomeScreen2.png’></span></p></div>”
Standalone html
This method of configuring the Welcome screen may require input from technical services. The graphics files must reside on the OLIB server.
By default a welcome screen is shipped with the system but the welcome_screen setting is not "included" (Include=No).
- Create an html page of your own and save the page into the WebView/pphtml directory.
- Go to OPAC> Configuration Settings to edit the welcome_screen setting in gno_startup so that it links to your welcome screen.
- In OPAC> Configuration Settings search for welcome_screen.
- Open the details in Modify mode.
- In the Value field enter the name of the html file in " " double quotes, e.g: "Welcome_CP.html".
- Make sure Include = Yes and save the changes.
Note: the welcome_screen setting has Include=No as part of the installation process so that the new default screen in the welcome_message setting is used instead. If you would rather continue to use the welcome_screen setting, simply re-include it (Include=Yes).
Screen display
If there is overlap between the menu / panels / quick launch searches, the following settings in gno_startup can be added to prevent the overlap:
| Config Setting ID | Interface | Config Block | 場景 | Value | Sequence 1 | Sequence 2 | Include? |
|---|---|---|---|---|---|---|---|
| 1000223 | 1 | gno_startup | style_line |
“#results { margin-top: 50px; margin-bottom: 25px; }” |
201 | 7 | Y |
| 1000212 | 1 | gno_startup | style_line | “.searchFormCell { padding-left: 8px; width: 70%; }” | 201 | 8 | Y |
Note: sif_label_width is also required in gno_startup if you have a search input field label that goes across more than one line. A Value of e.g. 25, widens the width of the label cell so that it fits on one line.
